We often get asked if it’s possible to put a Content Snare request on a website so that anyone can fill it out.
While it isn’t possible, there’s a workaround. In many instances, this is a better workflow.
If you were to add a large form on your site, there’s a reasonable chance that someone will begin filling it out, realize it’s too hard (or get distracted), and abandon it.
You’ll never even know they tried.
But if you have a small, easy-to-complete form first, then follow up with the bulk of the questions in Content Snare, it’s a win for everyone.
You’ll get the prospective client’s info, and they’ll be able to complete the harder questions on their own time without having to do it all in one go.
To do this, you’ll need to use an intermediate workflow tool called Zapier.
The process for this looks like:
- Your prospective client fills out a form on your website
- Zapier automatically creates a Content Snare request when the form is completed
- Content Snare follows up with your client to complete the rest of the information
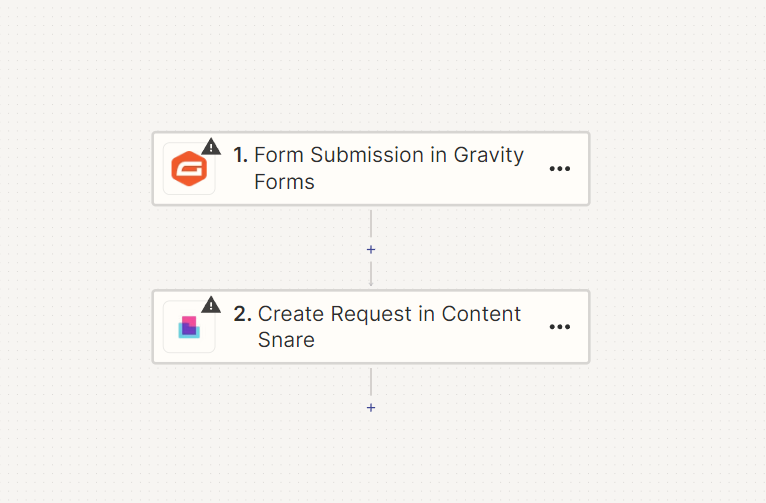
This is what a simple workflow would look like in Zapier:

The simple version is to send the same request to everyone.
The more complicated one below uses Zapier’s Paths to send a different request based on what service they selected in the form:
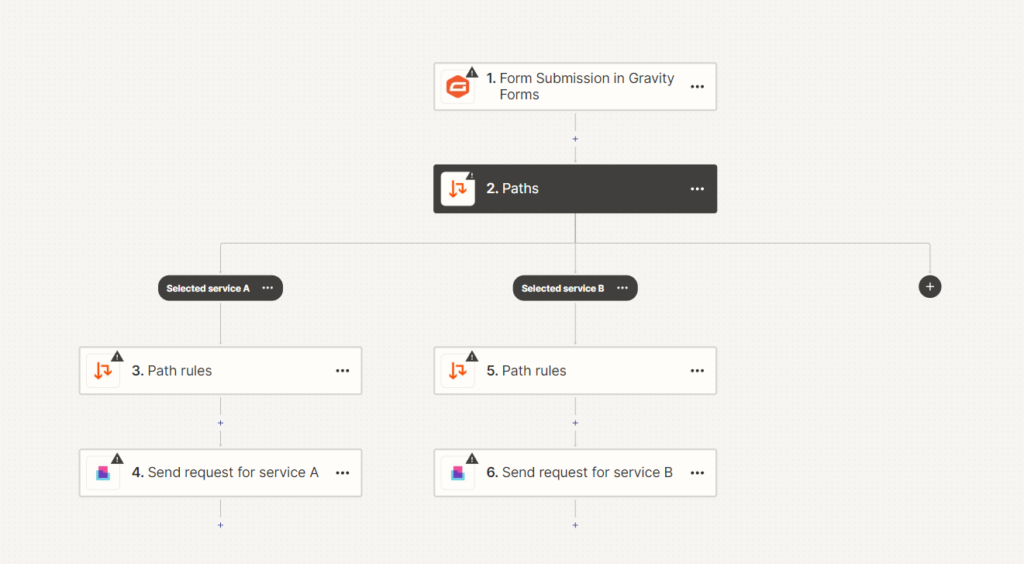
You’ll have to substitute Gravity Forms for whatever forms tool you typically use. You could build this workflow with any forms tool that Zapier supports, like Typeform, Jotform, Tally, or Google Forms.
If you’re using Microsoft Forms, you’ll need to first set up your form to work with Excel. Then use Excel as the trigger for the Zapier workflow.
How to do this step-by-step
First, you’ll need a Zapier account.
Once you have signed up, create your first workflow by clicking the “Make a Zap” button.
For the sake of this tutorial, you’ll need simple forms software like Typeform, Gravity Forms, or Google Forms. In our example, we’ll be using Gravity Forms.
Step 1: Create your simple contact form on Gravity Forms
The first step is to create your contact form and embed it on your website. Embedding is another guide in itself — each website builder is different but it shouldn’t take you more than a couple of minutes.
| Note: We recommend capturing your client’s basic contact information so you can later feed it to Content Snare using Zapier. |
Step 2: Create a trigger
You’ll trigger this workflow with Gravity Forms “New Entry” trigger. Every time a client completes a field, we’ll add it to our daily summary.
Now go ahead and test the trigger to get some sample data.
As you can see, the fields are pretty straightforward. Zapier will pick up the form’s latest answer.
You’ll only require the 3 fields to create a client in Content Snare:
- Company Name
- Full Name
Step 3: Create a Request in Content Snare
Again, pick Content Snare from the list and choose “Create Request” as the Action Event.
After, it’ll ask you to set up the action. You can choose from a multitude of options. We suggest keeping it simple.
| Note: You can create a client and the request in one step. You do not need a “Create Client” step first. |
- Name: This is the name of the request. For this example, we chose “Name” and the entry’s “Submit Date” from Gravity Forms.
- Folder: If you don’t choose a folder, it’ll default to “Default Folder”. To keep things organized, We suggest creating a folder for this automation. After all, automation is meant to save you time!
- Request Template: This is where you’ll choose the request to be sent for the automation. Zapier will pull all of your templates so you can choose one.
- Email: This is the email of the Request’s recipient.
- Full Name & Company Name: These fields are only required for “New Clients”. Make sure to include these questions in your form if you aim to create new Content Snare out of this automation.
- Due: If you’re planning on having this automation run forever, leave this space blank. It will automatically default to set the due date to 14 days from when the request is created.
Even if you’re doing it for an event, most likely your clients won’t answer on the same day.
Continuing on the same step, don’t worry, we’re almost finished!
All of the settings that you’ll see here are the same as the last phase of the Request creation process.
- Status: Unless you want to micromanage your requests, always set it to “Published”, otherwise your request will default to “Draft” and won’t get sent.
- Communication Template: This is where you’ll choose your reminder schedule. We recommend you create a separate one for this automation. A one-size-fits-all kind of template is not recommended.
- Request Owner: If you’re running a one-person show, opt to create an alternate email address, add it as a team member, and assign it to this automation. If you don’t mind mixing your Requests’ notifications in one Inbox, then assign yourself as the Request Owner.
- Share Via Link Enabled: This allows your Client to access the Request without needing them to log in.
- Passcode Enabled: If you want an extra layer of security, you can require your client to enter a PIN code to access the request.
Step 4: Test your Zap and turn it on
At the end of your Zap creation process, don’t forget to test it out. Don’t be scared if an error pops up.
Zapier can be kinda clunky sometimes and mark things as errors just because it had a bad day.
At the bottom, you’ll see a black bar asking you if you’re ready.
If you’ve gotten this far in the guide, of course you’re ready. Go ahead and turn it on!
Need help? Let us know
In case you’d like help setting this up, let us know.
If you have any questions or would like us to create a guide for another service, feel free to reach out at support@contentsnare.com or leave a message using the chat widget.