Content Snare integrates with SharePoint and OneDrive, so you can automatically sync your files and documents with these two online storage platforms. SharePoint integration allows the selection of different SharePoint drives.
| Note: You will need to create a new, empty folder for Content Snare exclusively because Microsoft imposes certain restrictions on how we can access your files. Our platform can only access one folder in your account. It also cannot see any of your existing files or folders, even if they are in that folder. |
How to set up your SharePoint/OneDrive integration
Create a new, empty folder in OneDrive or SharePoint and give it a name. Our suggestion is to call it “Content Snare” for the sake of simplicity. Once done, go to the Content Snare dashboard and:
- Click the avatar in the top-right corner and choose Settings from the drop-down
- Click Applications on the left

You’ll see a list of apps, so just click Integrate with OneDrive or SharePoint.
| Note: The system will automatically send an email to inform you that the SharePoint/OneDrive integration was enabled. |
This will open a pop-up window asking you to configure the integration. Click Select a Folder and choose the folder you created earlier. Set up a path where Content Snare will store files inside the existing folder. You can include placeholders like the client name and the request name.

After that, complete the rest of the settings and click Activate in the bottom-right corner.
| Note: Files that you or your client deletes in Content Snare are not deleted in the integration. They are renamed in the format: [filename]-deleted-[yyyymmdd]-[hhmmss].[extension] |
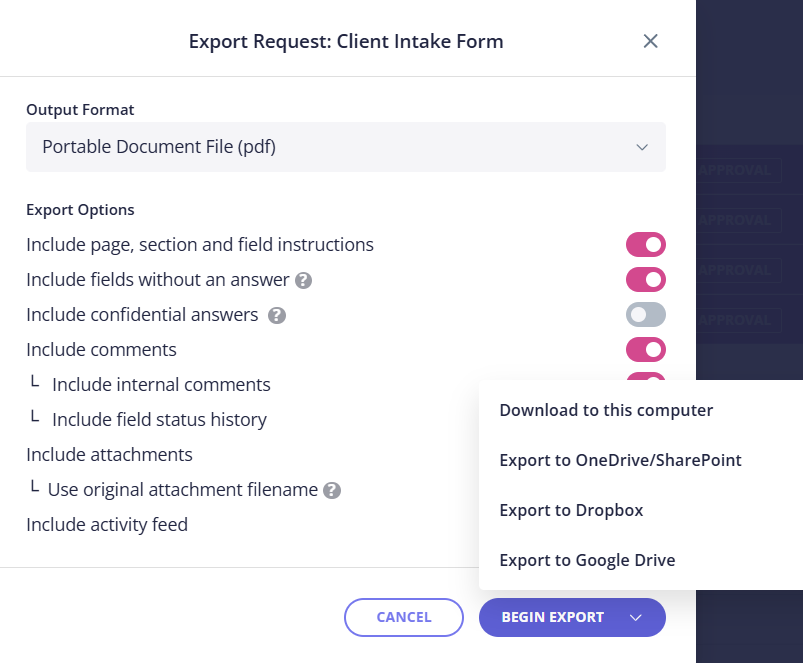
Once set up, you can also manually export requests to OneDrive/SharePoint. This gives you additional options like including/excluding instructions, fields without an answer, comments, and so on:
Should you wish to reconfigure or remove this integration, you’ll find both options in Settings → Applications → OneDrive/SharePoint.
Automatically upload client files
It’s possible to choose when to send files to SharePoint/OneDrive. There are three options in the drop-down menu:

Just choose the preferred option and then click Update to reconfigure settings.
Automatically generate export file
The request PDF export can be generated automatically if you enable this option in settings. To do that, update your SharePoint/OneDrive configuration by enabling automatic exports:

You can also change the default export format (PDF) from the drop-down menu and choose whether to include confidential answers.