In the fast-paced world of e-commerce, online marketplaces are always looking to add new sellers to their platforms to drive engagement and boost sales. But without the right technology and processes, onboarding sellers can be fraught with problems.
In this article, we’ll explain everything you need to know to deliver a seamless seller onboarding experience — and how technology can help.
But before we dive in, let’s define what we’re talking about.
What is seller onboarding?

Seller onboarding is the process of welcoming new sellers, sometimes known as new suppliers, to a digital, multi-vendor marketplace. It involves gathering all the information the marketplace needs to integrate the seller into its systems. It’s also an opportunity to align on policies, procedures, and expectations.
The faster and smoother the seller onboarding experience, the easier it is for the seller to get up and running — and the sooner both parties can benefit from the partnership.
How is seller onboarding different from the vendor onboarding process?
In many cases, the words ‘seller’ and ‘vendor’ are interchangeable. But in this case, seller refers to a business that sells its products to customers via a digital marketplace, whereas vendor refers to a business that sells its products or services directly to another business.
The seller onboarding process and vendor onboarding process naturally differ in some ways, but they both have the same ultimate goal — to integrate one business into another’s systems and processes as smoothly and quickly as possible.
What are some of the typical challenges of seller onboarding?
Typical seller onboarding challenges include poor communication, time wasted on repetitive manual processes, a lack of standardisation, and legal and compliance issues.
These issues are invariably the result of the processes and tools used to facilitate seller onboarding. Businesses relying on outdated systems will struggle to deliver a smooth, seamless seller onboarding flow. As a result, it will take longer to get new sellers set up.
How can technology streamline the seller onboarding process?

Technology can help you deliver a seller onboarding process that is efficient, smooth, and scalable. With the right tools, you can streamline and automate processes related to seller onboarding. Here are some examples.
1. Communication and collaboration
Effective communication is critical throughout the seller onboarding process. By using instant messaging apps, video conferencing tools, and screen recording software, you can keep sellers in the loop and answer any questions they may have as they arise.
2. Task management
By breaking down the onboarding process into manageable tasks, you can ensure a simple, standardised process that’s easy to follow. Task management software can help you assign tasks, track progress, and set deadlines across your team.
3. Document management
Seller onboarding involves a lot of documentation. Without a dedicated system for managing and storing e-documents, things can get pretty messy. Document management systems allow you to manage everything to do with e-documents, from storage to document generation and e-signatures.
4. Information gathering
Gathering seller information is one of the most important steps of the onboarding process. Without key details about the seller’s business, products, and financial information, you can’t onboard them into your marketplace.
With a dedicated information-gathering tool like Content Snare, you can build custom seller onboarding checklists, auto-send reminders, and capture the information you need without the back-and-forths.
Gather the information you need with Content Snare
With our intuitive custom web forms and ready-made templates, it’s never been easier to gather key information, documents, and data.
What is a seller onboarding checklist?
A seller onboarding checklist is a digital web form that you create and share with new sellers. The checklist guides the seller through a series of submissions, spanning everything from basic information to legal documents.
Like a vendor onboarding checklist, the idea is to gather all the information you need from the new seller to effectively onboard them into your systems. With this in mind, the best onboarding checklists are clear, intuitive, and easy to use.
What should I include on a seller onboarding checklist?
Below you’ll find an overview of the type of information you’ll need to gather to effectively onboard sellers into your marketplace. It’s worth noting, however, that every marketplace will have its own unique needs depending on its internal policies, processes, and the type of products it sells.
1. Contact information
First of all, you need to capture basic supplier data. This information will eventually end up being transferred to your CRM.
- Name
- Business name
- Business address
- Phone numbers
- Email address
2. Business information
Next, you need to capture basic information about the seller’s business, including the industry or sector it operates in.
- Business type (sole trader, partnership, corporation, etc.)
- Business registration number (if applicable)
- Industry or product category
- Website URL
- Social media profiles
3. Product information
Next up, you need to gather information about the sellers’ products that you’ll be offering via your marketplace. The amount of information you collect here will depend on the complexity of the products and the number of unique items being sold.
- A description of the product or service being offered
- Pricing information
- Inventory or stock availability
- Product specifications (size, colour, weight, etc.)
4. Shipping and fulfilment
You also need to gather as much information as you can about shipping methods and times. This will help you set realistic expectations when dealing with customers.
- Shipping methods and carriers used
- Average delivery times
- Returns and refund policies
- Packaging and labelling requirements
5. Legal and compliance
You’ll also need to gather any compliance-related documentation. This will help you ensure that the seller is legally registered and compliant and that the products you are selling are safe to use.
- Tax identification number (TIN)
- Business licences and permits
- Compliance with relevant regulations and standards
- Intellectual property rights (trademarks, copyrights, patents, etc.)
6. Payment and financial information
Collecting the seller’s financial information will allow you to add them to your payment systems and ensure smooth transactions.
- Preferred payment methods
- Bank account details
- Credit card processing information (if applicable)
- Invoicing preferences
7. Marketing and branding
Every seller will have different requirements when it comes to presenting their products on your marketplace. In this section, you’ll gather as much information as you can about marketing and branding, allowing you to build custom pages for each seller.
- Brand guidelines and requirements
- Logo and branding materials
- Marketing and advertising strategies
- Promotional campaigns or discounts
What’s the best way to create a seller onboarding form?

There are various tools you can use to create and send onboarding checklists. Some businesses still rely on a combination of outdated tools like email, spreadsheets, and PDFs. While legacy tools may be familiar, they are often problematic, resulting in:
- Inefficient, time-consuming processes
- A poor UX and onboarding experience
- Partially completed forms
- Endless back-and-forth emails
- Mistakes and inaccuracies
Alternatively, you can use a dedicated information-gathering tool like Content Snare, which streamlines and automates the entire process of requesting and collecting client information and documents. Here’s how it works in four simple steps:
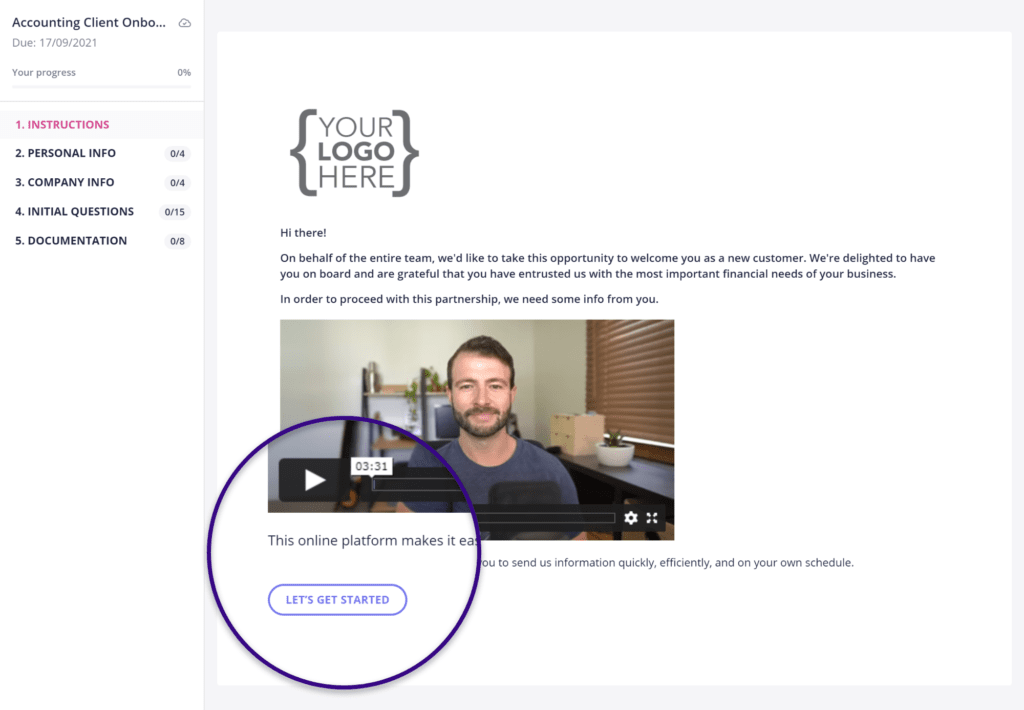
1. Build a custom onboarding checklist
Content Snare allows you to build intuitive custom web forms with ease. Alternatively, you can use one of our growing number of ready-made templates and be up and running in a matter of clicks.

Our user-friendly web forms offer tons of handy features that legacy tools can’t provide, such as:
- The ability to specify exactly what info you need — text-only answers, images, files, and many more
- Clear instructions for every question or request, including text, images, and video
- In-app conversations, allowing clients to ask questions about specific requests
- Auto-save functionality, meaning sellers can complete the checklist in multiple sittings without losing their progress
- Conditional logic that displays or hides certain fields based on the seller’s previous answers
- Pre-filled fields for the information you already have
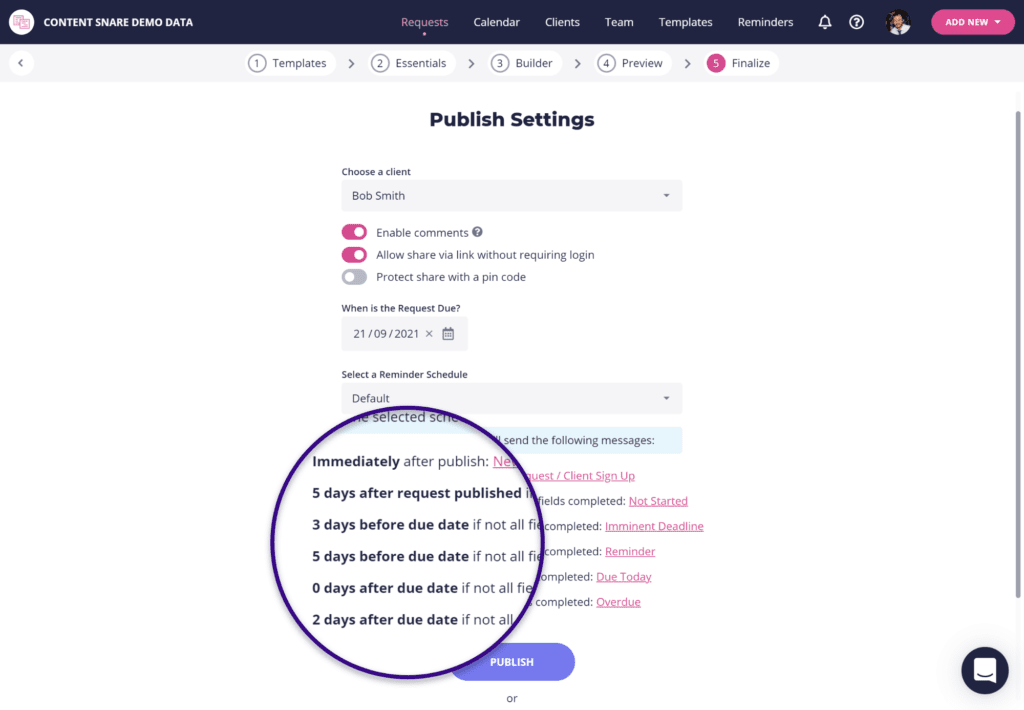
2. Send automated reminders
Chances are, some sellers will forget to complete their checklist. Instead of chasing them for missing information via endless emails or phone calls, Content Snare allows you to send automated reminders at a schedule that you choose.
The reminders you send are fully customisable, but you also get ready-made email and SMS templates to make things easier.

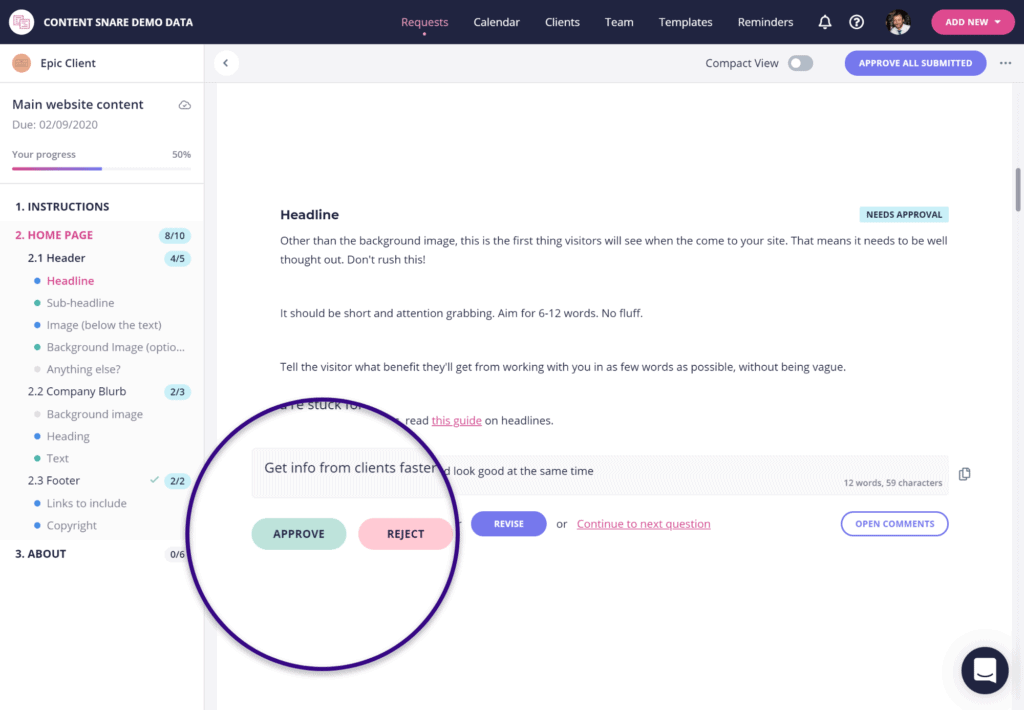
3. Approve or reject submissions
Content Snare also streamlines the approval process. When a seller returns a completed form, you can approve or reject submissions with a single click. If you need additional information, you can request it right there in Content Snare, without having to resort to email.
You can also track progress towards completion by seeing which items have been approved and which are still outstanding.

4. Export information
Once you’re happy that the form is complete, you can download the seller’s responses as a complete package. You can then export the data to various different file formats, including Microsoft Word, PDF, and CSV.
You can automatically sync Content Snare with popular online storage services like Google Drive, Dropbox, and OneDrive. So once requests are approved, the data is sent automatically to your storage platform of choice.
You can also use our Zapier integration to connect Content Snare with your existing tech stack and create all kinds of automated workflows. For example, could automatically send seller details to your CRM upon approval. Not only does this save you countless hours, but it also removes the risk of human error.

