You’re committed to creating an awesome onboarding experience to welcome your new clients into your business.
But what exactly do you need? What should your process look like? And how do you put together an effective client onboarding checklist that your staff can use consistently across your business?
This post will do you well if you still don’t have the answers to these questions. Let’s see how to streamline your client onboarding process by crafting a comprehensive onboarding checklist.
How can a checklist improve your client onboarding workflow?

Most people hate bureaucracy, but there are occasions when just a little bit of digital paperwork dramatically improves business processes. That’s the case with onboarding checklists, so let’s breeze through their major benefits.
1. Standardization and consistency
A well-designed checklist ensures a consistent onboarding process. That way, you will avoid oversights and provide the same level of service for each client.
2. Risk mitigation and compliance
Onboarding processes often involve regulatory and legal requirements. A checklist reminds you to take care of all necessary compliance steps, so you can avoid potential penalties or legal issues.
3. Minimize errors
A well-designed checklist decreases the odds of making mistakes or omitting critical steps during the new client onboarding process. It does so by providing a clear roadmap of tasks and requirements for any given project.
4. Maximize efficiency

In addition, checklists streamline the onboarding workflow by outlining the most efficient order of tasks. They also reduce unnecessary delays because your team members don't have to waste time figuring out what to do next.
5. Better client experience
Last but not least, a well-structured onboarding process creates a positive first impression. It makes all parties involved more comfortable, so you can smoothly build successful client relationships from the outset.
What to include in your customer onboarding checklist

Your specific client onboarding process will be shaped by your industry and your business. But here are some of the key activities you might want to include:
- Issuing your proposal.
- Issuing your contract or Ts&Cs.
- Collecting payment from the client.
- Sending the client onboarding questionnaire.
- Providing the client with a welcome pack (if applicable).
- Kicking off the project.
- Checking in with the client.
Depending on the size and structure of your organization, some of these steps may not be required. Or you may need to add other activities that are pivotal to what you deliver as a business.
The key is to create a checklist that is suitable for your company.
Once you feel confident about the high-level steps you want your onboarding process to include, you can start to break them down into individual tasks to create your own internal client onboarding template.
You can then assign an owner to each task by appointing the role or staff member in your business who is responsible to carry out that activity, attach deadlines, and add specific instructions around how you want the activity to be implemented.
How much detail should you include in your client onboarding checklist?

There’s no hard and fast rule here, but make sure you don’t blindly copy and paste examples you may find on the internet.
While using an existing template means you don’t have to start from scratch, they might not be a good fit for your business, and following one to the letter may only overcomplicate your process unnecessarily.
Each task that makes it to your final onboarding checklist should deliver a result to your business and your clients. Anything that doesn’t save you time, help you provide a better customer experience, or make things easier for you or your new clients, doesn’t deserve a place in your process.
So make sure you only include as many (or as few) details as you need to make the template work for you.
Client onboarding checklist: Create a template in 7 steps
Every onboarding process is different, but the following steps apply to pretty much all types of clients and businesses.
1. Issuing your proposal
When you break down the process of issuing your proposal, your checklist may look something like this:
- Produce a proposal based on the information provided by the customer during the sales call.
- Obtain internal sign-off of proposal (optional).
- Issue proposal to the client.
- Collect the client’s feedback on the proposal and amend accordingly (if required).
- Chase the client’s sign-off of proposal (if required).
- File the signed client proposal and share it with the relevant parties within the organization.
At this stage, you’ll want to clarify where your client is right now and what they want to achieve by working with you. It’s only by fully understanding their aims and objectives that you can produce a proposal that’s fit-for-purpose and estimate the scope of the work required.
Being clear on your deliverables from the start will also help you avoid experiencing unpleasant situations or scope creep during later phases of the project.
2. Issuing your contract or T&Cs

When you break down this step in your process, your new client onboarding checklist template may look something like this:
- Draft the contract or Ts&Cs (based on the information included in the signed off proposal).
- Obtain internal sign off (optional).
- Send the contract or T&Cs to the client.
- Collect client’s feedback and amend documentation accordingly (if required).
- Chase client’s sign off of contract or T&Cs (if required).
- File the signed contract or T&Cs.
3. Collecting payment
When it comes to collecting payment from your client, you may have a few keys steps:
- Issue the invoice using your company invoicing software.
- Chase the client for payment (if required).
- Verify and confirm client payment (through your company invoicing software).
4. Sending the client onboarding questionnaire or customer onboarding form
If you need information from your client before you can get started with the work, a client intake form may be a great tool to obtain it.
Related: How to create a client intake form for your service-based business
At this point in the process, you may also decide to send your client a welcome email or pack, if applicable to your business.
It could be a physical pack that you send via snail mail or deliver in person at your first meeting, or a welcome email containing links to training material or any documentation that will help you start things on the right foot and make your client relationship smoother and easier in the long run.
Your welcome pack or email may contain basic information about your business and your ways of working, for example. But it’s also a great chance to get your new clients excited about working with you. So if you send one, make it count!
5. Kicking off the project

When it comes to getting started with the work, you may do that through a kick-off call or a face-to-face kick-off meeting. Or, if possible and relevant, you might choose to have both.
The way you structure your kick-off will depend on your business and the type of project you’re about to embark on, but you should use this opportunity to:
- Introduce your client to any team members that will be working on the project.
- Revisit the deliverables (if applicable), the process you’ll be following, the team responsibilities, and all relevant deadlines.
- Set boundaries and clear expectations with your client - what are the do’s and don'ts? What information will you require from your client to carry out the work at each stage of the project? By when will you need it? Etc.
- Specify when and how you will review progress with your client.
- Allow the client to ask any questions they might have.
- Set clear next steps.
6. Checking in with the client
While this may not be applicable for your business, if at all relevant, you should consider scheduling a check-up call or meeting with your client a few days or weeks after your project kick-off.
While you could argue that now that the work is underway the client has been officially ‘onboarded’, it’s still early days into your working relationship.
Having a check-point allows you to gather feedback from the client and make any necessary tweaks to your project plan before you get too far into producing your deliverables.
Plus, this gives you the chance to check that your client is still happy - the last thing you want is for things to go rogue just after you’ve kicked the project off!
And if you’re still waiting on information from your onboarding form, you can fill in the gaps during this call or meeting.
7. Customer onboarding questions and additional information
Last but not least, your checklist should cover any exceptional scenarios. For example:
- How will you handle a delay in signing the proposal or the contract? When and how will you chase the client?
- What happens in case the client’s requirements have changed since the sales call, and your proposal and contract need to be amended? Who will make those changes and by when?
- How will you handle a delay in the client’s settling the invoice for the deposit or the full amount they owe you? How will you chase the client and how?
- What happens if the information your client sends you is incorrect, incomplete, late, or in the wrong format?
- Or how will you accommodate changes or additional requests that come in after your client has signed the contract and made a payment?
By going through each step of your onboarding process in detail, you’ll be able to identify potential pitfalls and exceptions. Look at all outcomes for each stage - including what may cause a delay to a task - and include contingency and appropriate measures.
Planning for and documenting these steps allows you to provide a more consistent customer experience to all your new clients.
Bonus tip: Update your checklist regularly
As business landscapes continually evolve, so do the requirements and expectations of clients. You can adapt to emerging trends by frequently refining the onboarding checklist to incorporate new best practices.
It also ensures that the client onboarding process remains aligned with the latest industry standards, so you can stay on top of changing compliance regulations and security protocols.
Build your client onboarding checklist with Content Snare

You can complete all the steps on your own, but there’s a much simpler solution.
It’s called Content Snare.
Our platform helps you get all the files, information, and documents on time, in the right format, and without having to rely on back-and-forth emails. You can quickly customize one of our ready-made templates, but you can also use them as are.
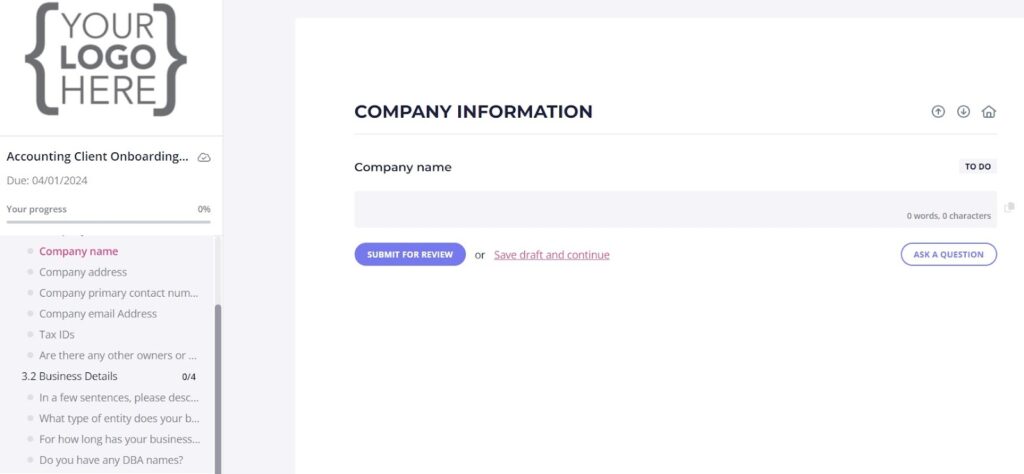
Here’s an example of our accounting client onboarding form:

You can find many other types of checklists, intake forms, or questionnaires for specific use cases in marketing, web design, accounting, bookkeeping, legal affairs, and so on.
Content Snare will make your client onboarding process much simpler, so you can actually focus on doing what you do best. Ready to give it a try?


