Email overload. A dreaded phrase.
We’ve been there before.
All you needed were a few files and some additional text info from your client.
But somewhere along the way, those email threads grew. Now you’ve spent all afternoon scrolling through countless emails from different departments looking for the latest files with the correct information. Precious work hours, gone!
This is where tools like file upload forms — a form with an upload option to collect files — can help.
Compared to other file request methods, a file upload form lets you collect content along with uploaded files. Instead of back-and-forth emails with your client, they can simply fill out a form, attach the necessary files, et voilà! It’s an easy way to collect both information and files in one go — the kinda stuff we love at Content Snare.
Ready to create your own upload forms? We’ll show you how, using two of the most popular form builders: Google Forms and Typeform.
If you’re not sure which platform you want to use, check out this side-by-side comparison of the best form builders along with their key features, pros and cons.
Content Snare’s all-in-one file collection tool includes upload forms with auto-save features, automatic email reminders and everything you need to make file collection easy. It’s designed to save you time, so you can focus on getting work done.
How to create a file upload form using Google Forms
Google Forms is straightforward and intuitive. If you haven’t built upload forms before, or you need to quickly create one, this could be a good option for you. It’s also completely free.
Before we jump into Google Forms, keep these in mind:
- Your clients will also need a Google account to upload files.
- Every file uploaded through Google Forms is stored in one Google Drive folder, meaning uploaded files aren’t organized.
Now, let’s look at how to create an upload form using Google Forms:
Step 1: if you don’t already have one, you’ll need to create a Google account.
Step 2: go to Google Forms.
Step 3: create a new form or use existing templates from the template gallery.

Step 3: edit the name and description of your form. Throughout Google Forms, you can click on the name of items to edit them directly.
Step 4: edit your questions.
Select your question type from the dropdown box near the form field. You have many options: short answers, paragraphs, multiple-choice, checkboxes, etc.
Type or edit your question directly in the form field.

Step 5: add more form field options (as necessary).
The floating sidebar has additional form field options, including the following:
- Add question
- Import questions
- Add title and description
- Add image
- Add video
- Add section

Step 6: add the file upload option.
Click Add questions on the floating sidebar.
Select File upload from the dropdown box near the form field.
You’ll see a pop-up saying the respondent will be required to sign in to Google in order to upload files. Press continue.

Step 7: edit the file upload requirements.
You can edit the following:
- Specific file types
- Maximum number of files (1, 5 or 10)
- Maximum file size (1MB, 10MB, 100MB, 1GB or 10GB)
*Note: the default maximum file size is 1 GB. Select Change to increase this number.
Turn on the Required button to make it a required field.
Select View folder to see where the file responses will save in your Drive.

Step 8: make final design and setting changes.
Use the menu on the top-right hand of the page to customize the theme, preview changes and edit form settings.

Step 9: send to recipients.
Select the Send button to add recipient email addresses, add collaborators, copy the form link and other options.
Note:
Your client will also need a Google account in order to upload files to your Google form.
How to create a file upload form using Typeform
Typeform is super user-friendly and has more robust design and layout features. If you want to create branded forms with ‘if this, then that’ options (Typeform calls this their Logic tools), then Typeform could work for you.
Before we dive in, here are a few things to note about Typeform:
- You will need to subscribe to Typeform’s Basic Plan ($29 per month, or $300 annually) to access the File Upload option.
- To remove the Typeform branding, you’ll need to subscribe to their Premium Plan ($59 per month, or $600 annually).
- Users have mentioned that Typeform’s user interface can lag when building longer or more complicated forms.
How to create a file upload form using Typeform:
Step 1: Select New typeform in your Workspace (if you’re already logged in, you can type www.typeform.new into your address bar to create a new typeform).

Step 2: add your questions.
Select your question type from the side panel.
Edit the question directly in the form field on the right.
Select the question type from the side panel again to bring up question settings, including: making questions required, multiple selection, randomize and other options.


Step 3: add the file upload option.
Select your question type from the side panel and scroll down until you see File Upload.
Enter your question and description directly in the form field on the right.
Make the file upload required by clicking the Required switch in the Question setting.
Note: the maximum file size your recipient can upload is 10MB


Step 4: let your recipient upload multiple files.
Add a Question Group from the Questions menu.
Add separate file upload questions in this group.

Step 5: publish your Typeform.
Edit the final layout and design in the Design tab.
Select the Publish button in the upper right hand corner of your Typeform.

Step 6. share your Typeform with others.
Head to the Share panel, copy the link and send it to your recipients.

Form builder limitations to keep in mind
Form builders like Google Forms or Typeform are great for collecting text answers along with files. But if you’re thinking of using them as comprehensive tools for collecting and managing file uploads from clients, it’s good to keep the following in mind:
1. You still need to use email for follow-ups and reminders. If you run into snafus, like your client didn’t fill out the form correctly, you’ll have to rely on email (and hope it doesn’t turn into a long chain of back-and-forths).
2. Uploaded files aren’t automatically organized. Files uploaded through Google forms are all stored in one folder on your Google Drive. This makes it difficult to track who uploaded what. Meanwhile, form responses are saved in a separate Google spreadsheet.
With Typeform, you’ll need to download the files to view them, making it hard to know what each person uploaded.
3. There are no checklist features. It becomes difficult to keep track of outstanding files with no built-in checklist features.
4. Your client will need a Google account in order to upload files to Google Forms.
5. There is no easy way to approve or reject uploaded files. With both Google Forms and Typeform, you have to manually email clients to discuss file approvals. This can be a huge time-waster if you’re coordinating several file uploads with a bunch of different people.
It’s pretty mind-blowing to think that there’s been a 50-fold growth of content and data from 2011 to 2020. Most of us need to share, collect and coordinate content with clients on a daily basis. Why is that process still so time-consuming?
Content Snare: an alternative to upload forms

Collecting files from clients shouldn’t have to be hard. That’s exactly what we had in mind when we built Content Snare. We created a comprehensive file-collection tool that works around the limitations of email and file upload forms, with features you might just love:
1. Drag and drop request builder. Easily build out your file requests. You can choose exactly what you need from clients by asking for files, images or text.
2. Upload files along with text data. Avoid the headache of receiving files in one platform and accompanying text in another. With Content Snare, you can ask clients for a combination of files, videos, images and text.
3. Instantly approve or reject files. You can approve or reject files directly as they come in. This cuts out yet another email thread.
4. Keep track of files with built-in checklists. When you build a file request in Content Snare, you can set up a checklist to keep track of content received. Catch what files clients still owe you at a glance.
5. Set up automatic email reminders. With form builders, you still have to manually remind clients if they forgot to send over the necessary files or haven’t filled out what you needed. We already waste so much time writing new emails every day!
Or, you can create automatic email reminders directly in Content Snare’s platform. Simply define a schedule for your email reminders and either write your own reminder email or use one of our templates. Easy, peasy!
6. Clients don’t need a Content Snare account to upload. Clients can upload files to Content Snare without having a Content Snare account. This makes life easy for you and your clients.
How to use Content Snare to collect files
Content Snare is an all-encompassing contect collection platform that makes it easy to get files, documents and more from clients. Made for digital agencies, finance companies, marketers and everything in between, this could be a great option for you if you need to collect any kind of information from others often.
Here’s how to use Content Snare’s Request Builder to collect files from clients:
Step 1: set up a Content Snare account.
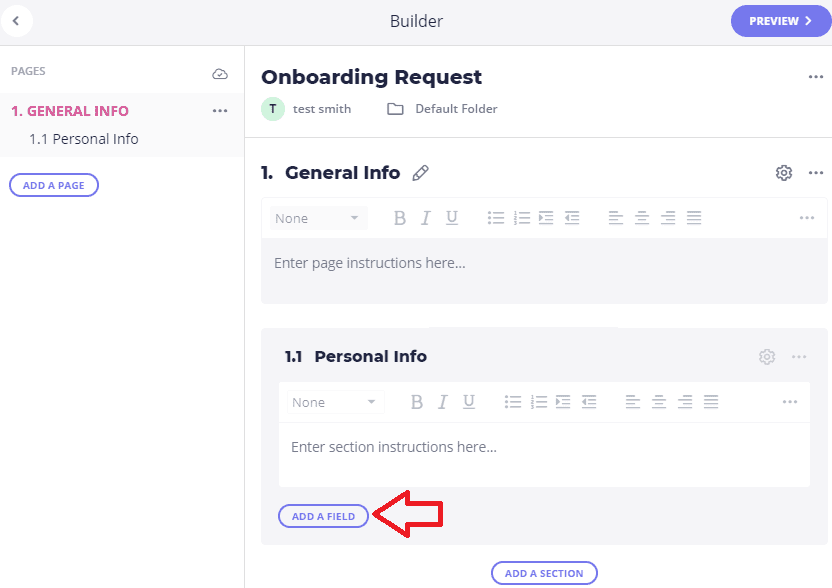
Step 2: build a new form request.
In the home screen, select Add New Request. This takes you to the Request Builder screen.

Step 3: in the Request Builder, edit the name of your pages and title of the request directly.

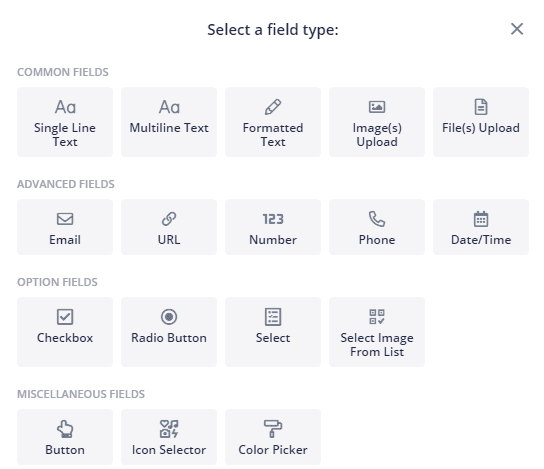
Step 4: add a new field to request information from clients
To collect information from your clients, select the Add Field button. Select a field type (the type of information you want to collect from your clients). Options range from single line text, multiline text, phone number, dates and more.
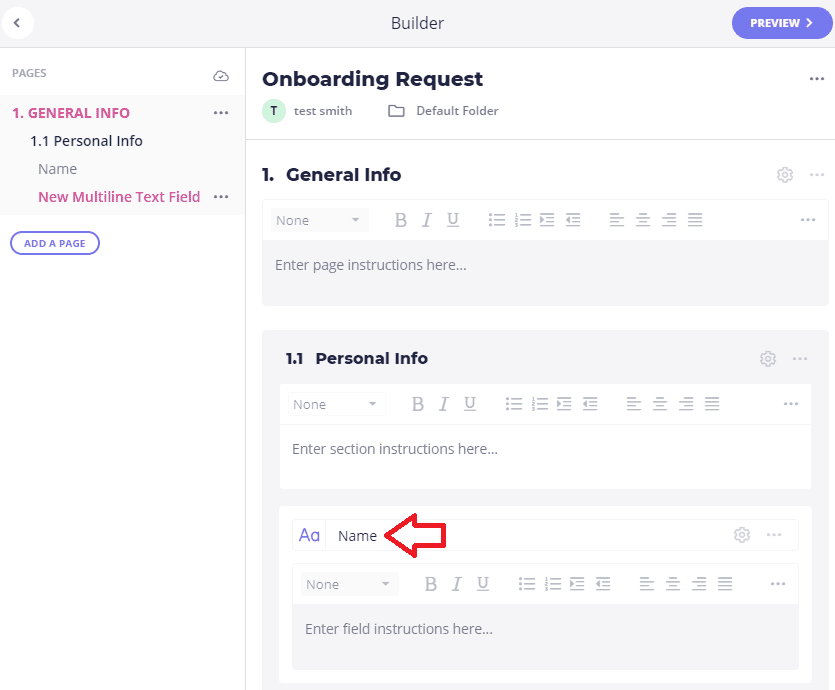
Step 5: edit the field title by replacing the text after Title:
Step 6: add a field to request files from clients.
To request files from your clients, select the Add Field button. Select the file field type you want your client to upload. Options include image, file or image gallery. You’ll be able to edit the field title directly.
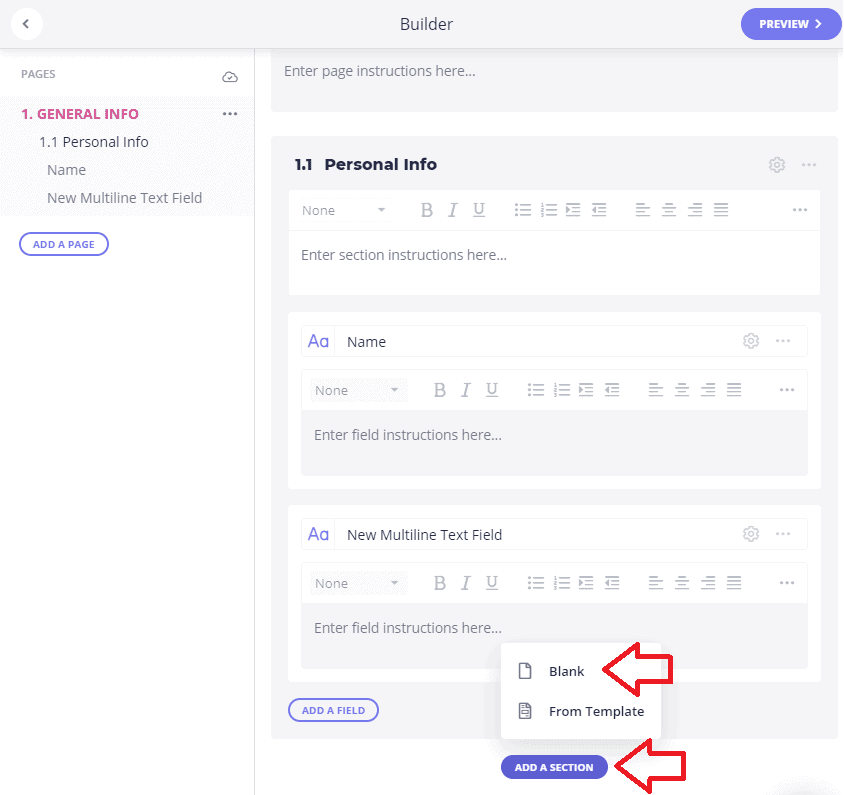
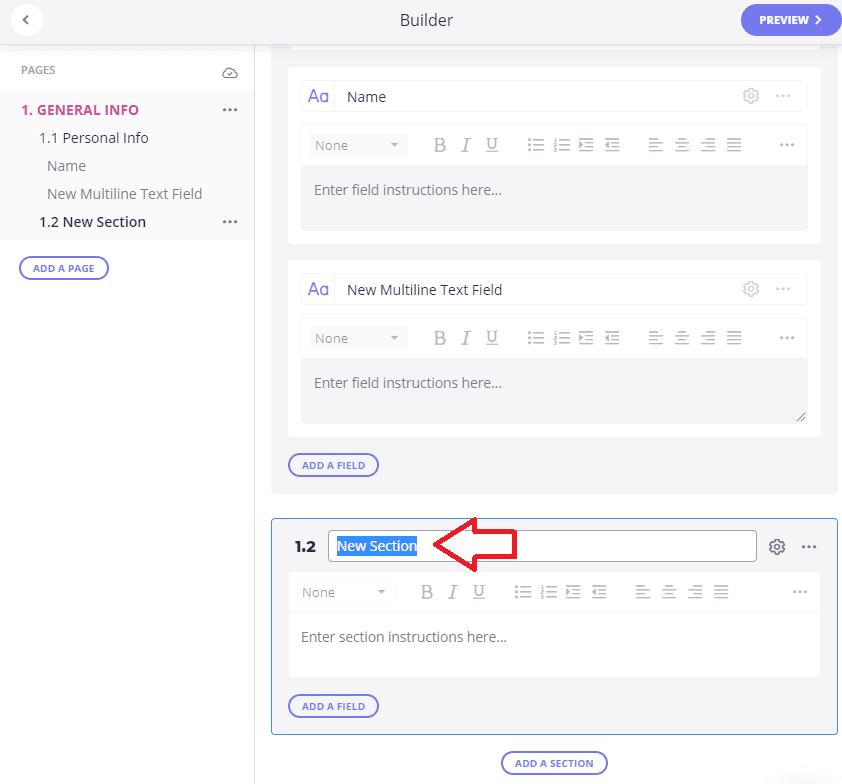
Step 7: add a new section to your current request.
To add a new section to your current request, select Blank Section. Edit the name of the section. You can add multiple sections in one request.
Step 8: view all your requests.
You can view all your requests in the Requests tab

Say goodbye to the days of unorganized upload forms and endless email reminders. Content Snare houses everything you need for collecting files under one roof.