Ask a client to send you files over email and it’s just a matter of time before you run into issues like file size limits or lose those email attachments in long threads. There are a few other ways you can request files from clients, and a popular option is to use a shared drive like Dropbox.
Ditch the endless email threads
Spare yourself the time wasted searching for attachments deep in your lengthy email threads. When you use Content Snare, clients can upload large files to you directly through the platform.
What is a Dropbox file request?
Dropbox file requests are an easy way to receive large files from your clients. The Dropbox feature is easy for your clients to use, and doesn’t require them to have a Dropbox account to submit files.
Pro tip:
The Dropbox file request size limit is 2 GB for basic users. However, clients who use paid plans (Pro, Standard, Advanced, Enterprise) have a Dropbox file size limit of up to 50 GB.
Here’s a step-by-step guide on how to use Dropbox to receive files, a couple of things to keep in mind, and another option to explore if you’re a business looking for a more powerful file request tool.
How to use Dropbox file requests
1. How to create a Dropbox file request
You need a Dropbox account to create a file request. Once you sign up for an account, log in to your Dropbox account.
Under the “files” heading on the left sidebar of the home page, select “file requests”.
On the new file requests page, click the blue “new request” button on the right.
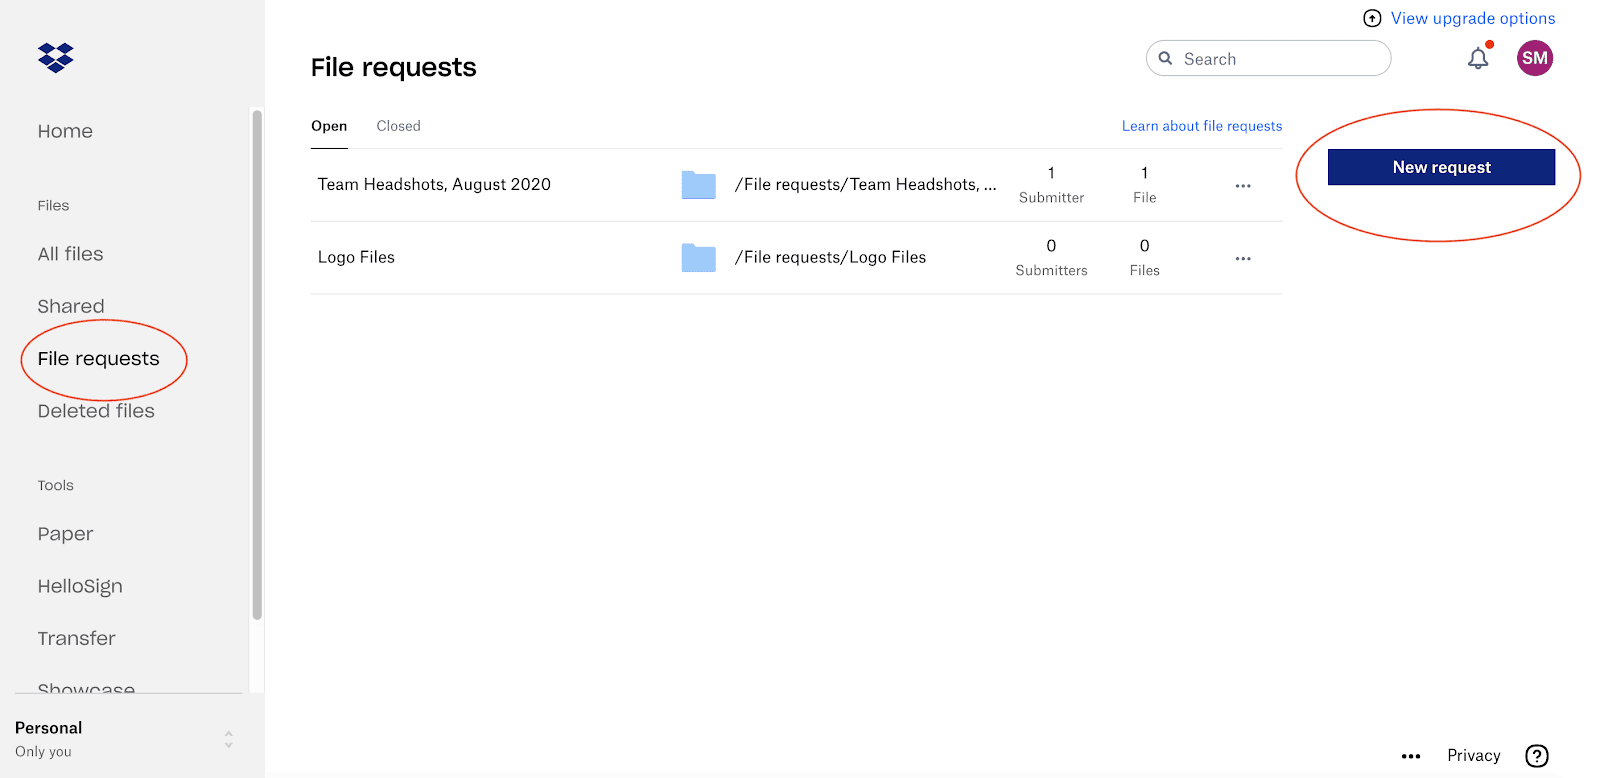
A “create new request” window will pop up asking you to fill in some fields.
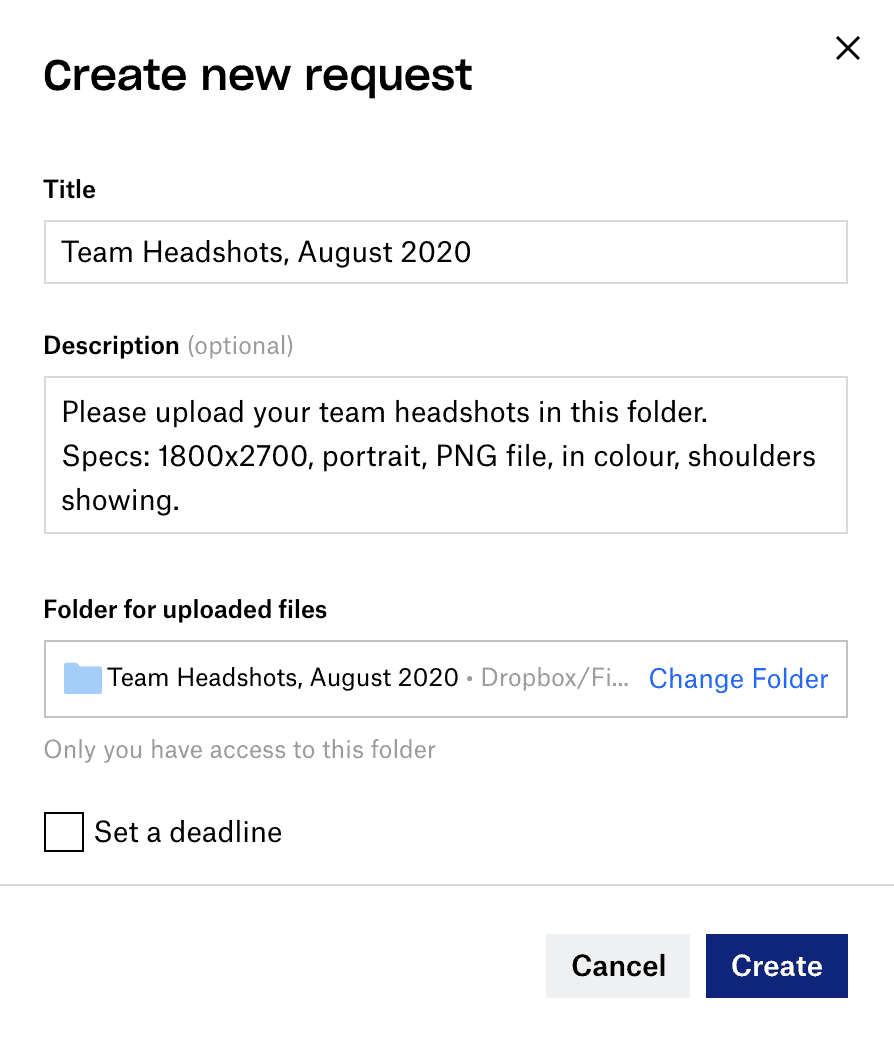
Here’s what to include in your request to make sure you get the right files from your clients:
- Title
This explains what the request is for and will be the default name of the folder you create within Dropbox.It’s not a bad idea to be specific with this name to stay organized. If you’re requesting headshots, for example, name it “Headshot Photos, August 2020”.
- Description
The description field in Dropbox is optional, but if you want to spare yourself a whole lot of back and forth when clients send you the wrong files, we recommend filling it out with detailed instructions. The more specific, the better!You can specify things like:
- file type (PNG, not JPEG for instance)
- image size (minimum and maximum pixels)
- photo orientation (portrait vs landscape)
- a descriptive note like “make sure we can see your shoulders in the headshots.” - Folder for uploaded files
This tells you where your clients files will go once they submit them.Dropbox selects “file requests” as the default folder, but you can select a different Dropbox folder manually if you click on “change folder”.
- Set a deadline
Another optional feature with Dropbox app is setting a deadline.Activate this feature by checking the “set a deadline” box.
When you check the box, the window will expand to show you three more fields.Select your deadline date and deadline time by clicking on the downwards arrows next to each field.
You can then choose whether or not you want to allow late uploads past that deadline, and if so, how many days late you will accept the file request.
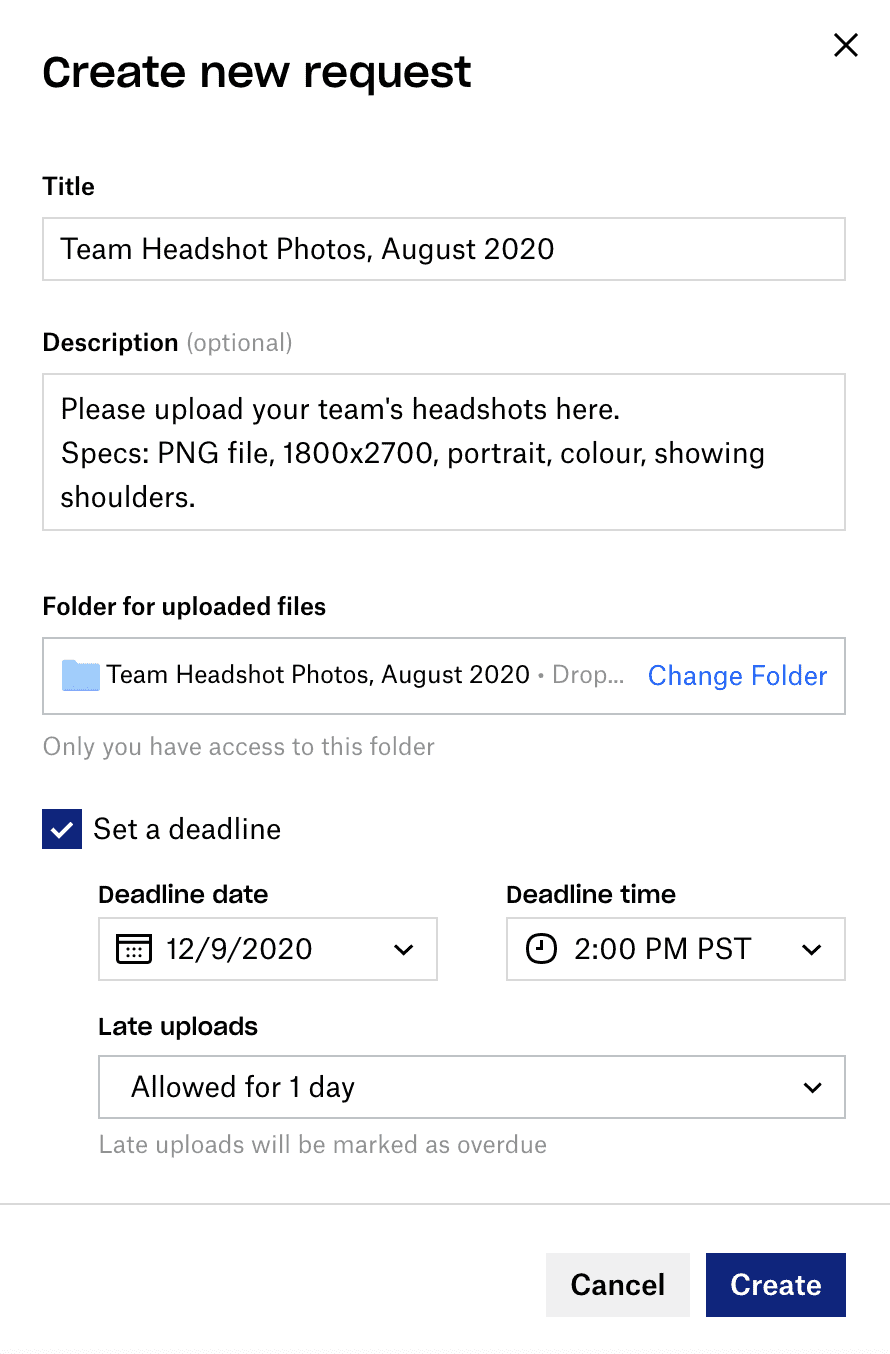
Once you have your fields in and your options selected, click the blue “create” button.
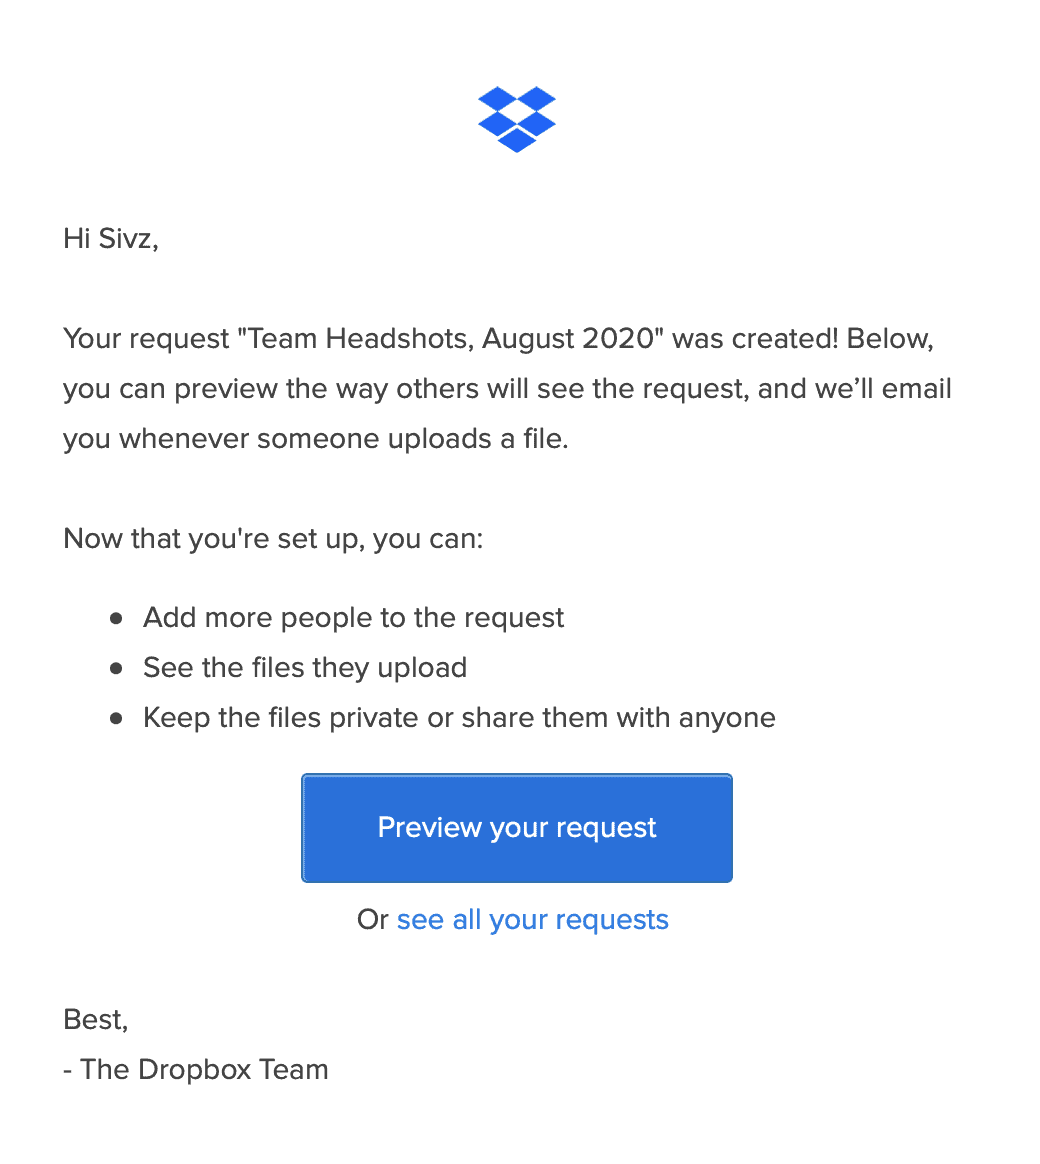
You’ll receive an automatic email from Dropbox confirming you’ve created a file request and giving you the option to preview it if you’d like. This is what it will look like.
This is also one of the simplest ways to send documents securely.
2. How to share a Dropbox file request
Once you have your new file request set up, a window will pop up titled “share file request”.
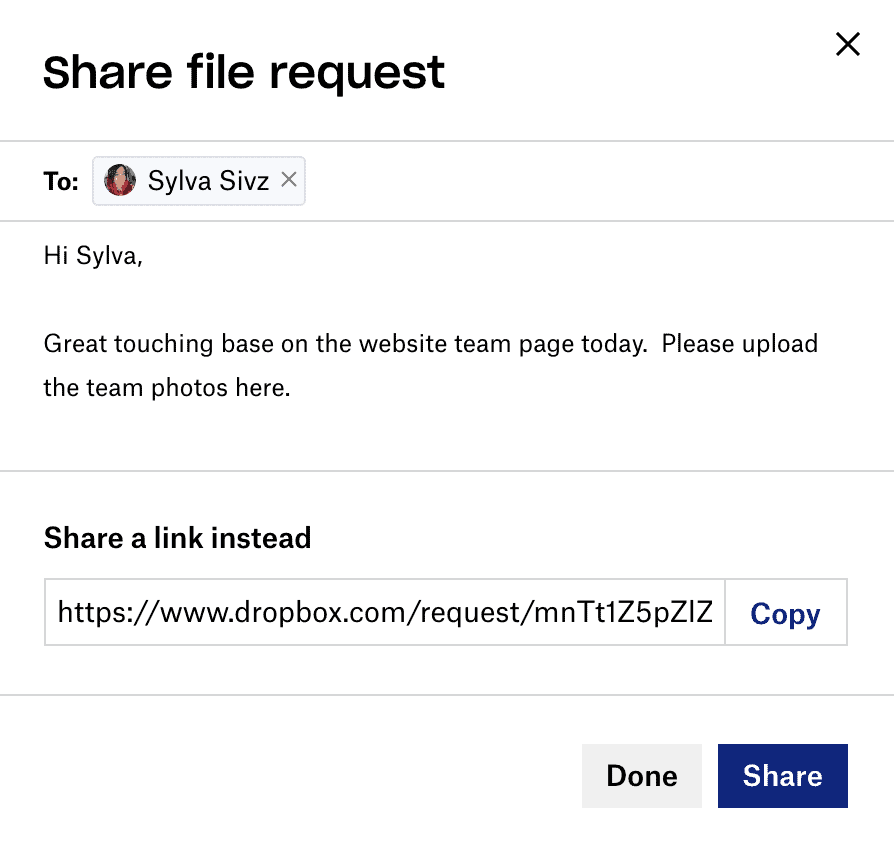
In the “add a message” space, you can add in an optional message for your clients. You might want to include one if your client isn’t familiar with Dropbox yet and you want to let them know this email is coming from you.
Then, you can share the file request in one of two ways:
- Email
In the “to” field, you can type in your clients email address. - Share a file request link
Under “share a link instead” you’ll see a long auto-generated link that sends visitors directly to your file request.To use this link, click the white “copy” button and the link will get copied to your clipboard.
You may want to share through the link instead if you plan on contacting your client or uploader via another platform like Slack or Asana.
Click the blue “share” button to send off your file request via email, or the white “done” button to close the window after you’ve copied the Dropbox file request link to your clipboard.
Related: How to use OneDrive file requests
How to change a Dropbox file request
Create a file request and realize you totally screwed up with embarrassing typos, forgot to add in the most important spec, or completely blanked on sending it to another member on your clients’ team? Whoops!
Don’t worry, you can still edit your file request even if you’ve closed off the file request window.
Here’s how to change your Dropbox file request:
Return to the “file requests” page in the Dropbox sidebar.
You will see a list of your “open” and “closed” requests.
Click on the three dots at the very end of the folder (or requests) row on the right.
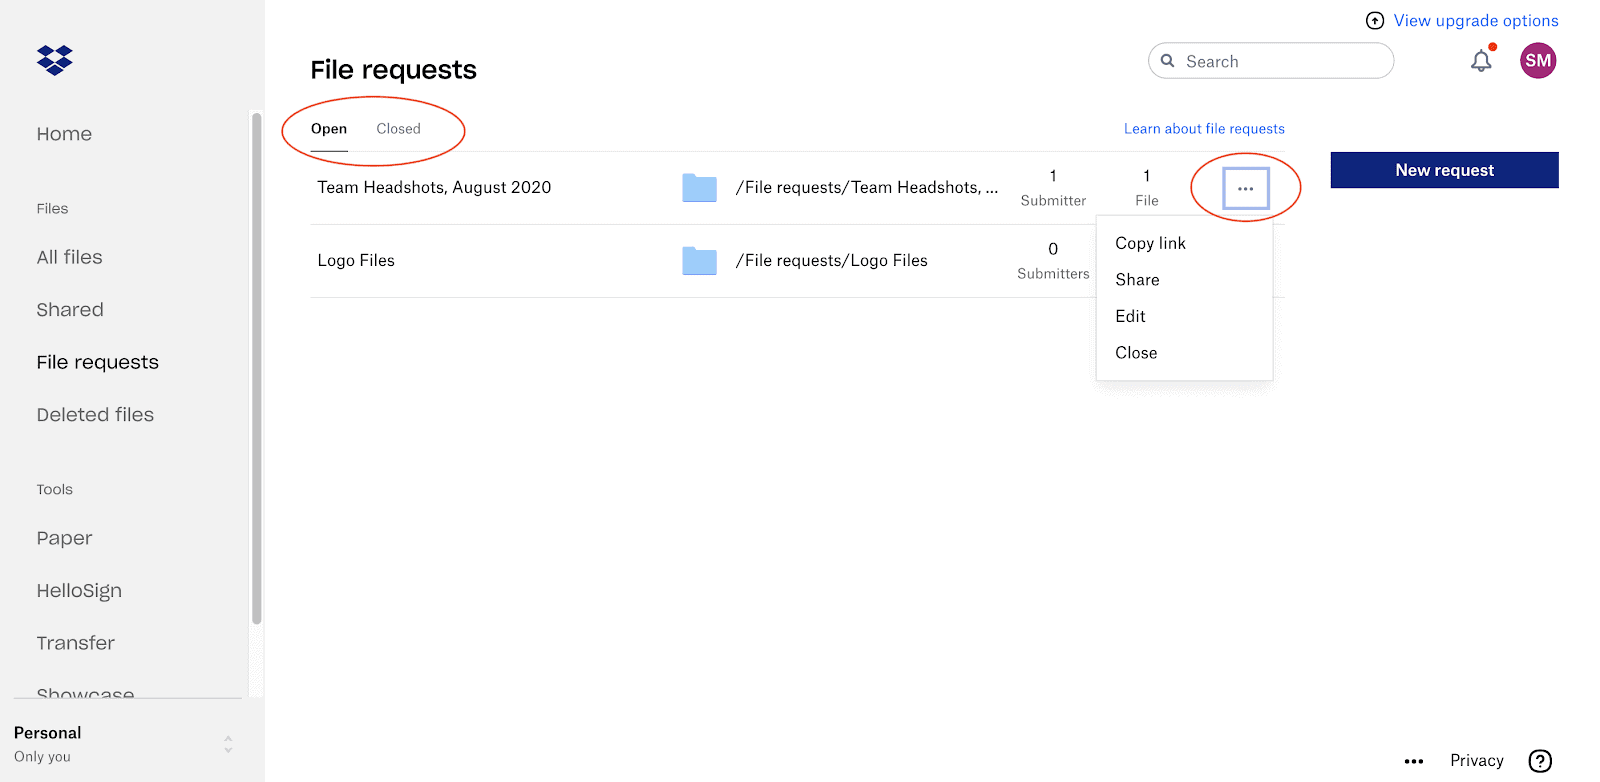
You will have the options to:
- Copy link
When you click this, the link to your file request will get copied to your clipboard again. You will see a small black window pop up at the bottom of your screen confirming it has been copied to the clipboard. - Share
Click here to re-share your request, or share it with more contacts. The same “share file request” window will pop up again asking you to share by email or link. - Edit
This is where you can edit your original file request including the title, description, and deadline. - Close
If you no longer need to receive files for your file request, selecting “close” will close the request, and move it to the “closed” tab of your file requests.
- Re-open (on the closed requests tab)
If you’re wondering how to reopen a closed Dropbox file request, select the “closed” tab on your file requests page.Click the three dots at the end of the row.
Select “re-open”.
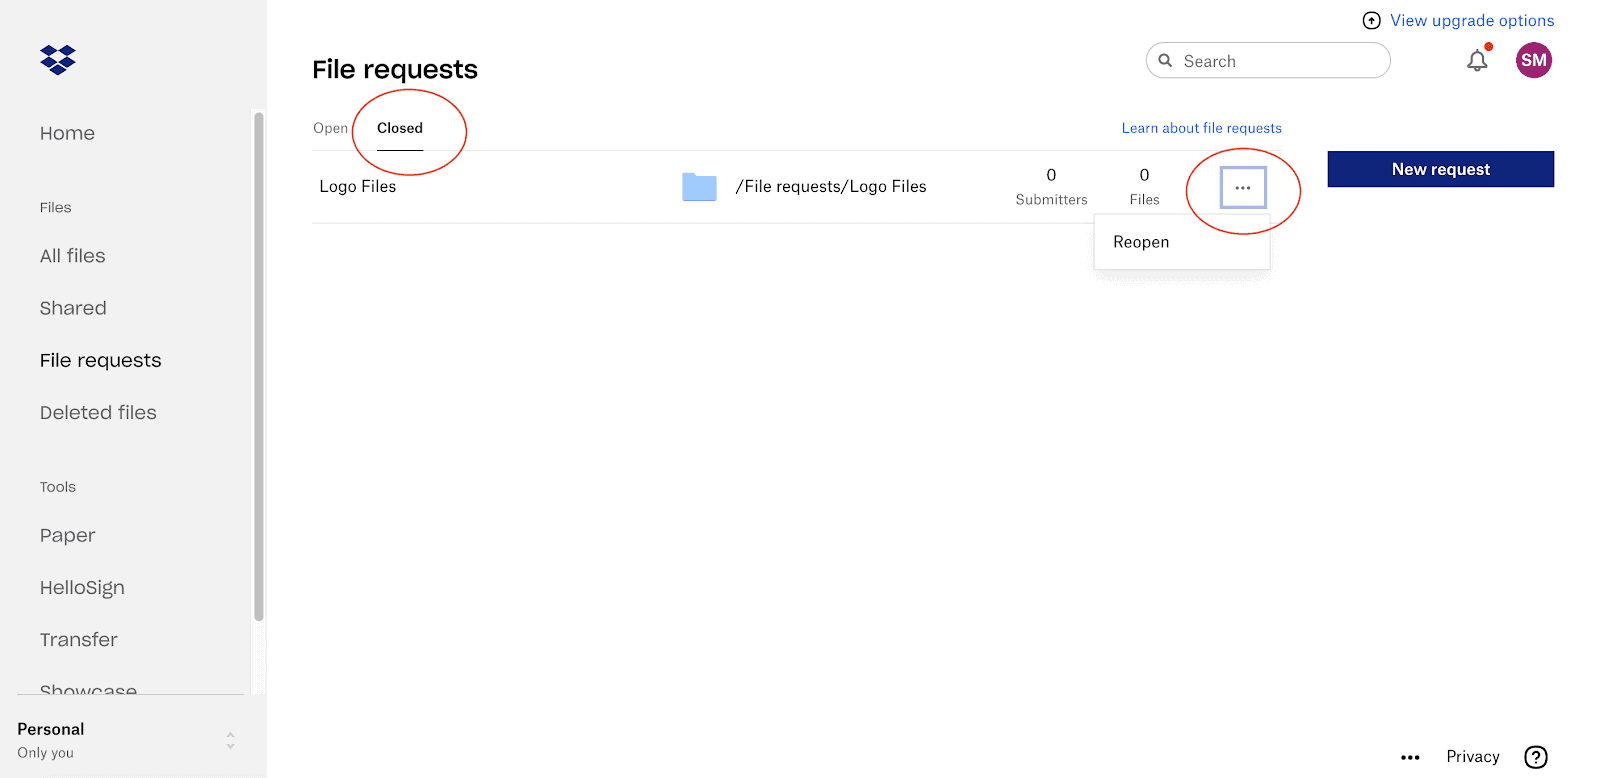
This will open your file request again, and move it to the “open” tab of your file requests.
How to upload files to a Dropbox file request
Now let’s take a look at how this all works on your clients’ side.
If you’ve sent your client the request via email, they’ll receive an email from Dropbox that looks like this:
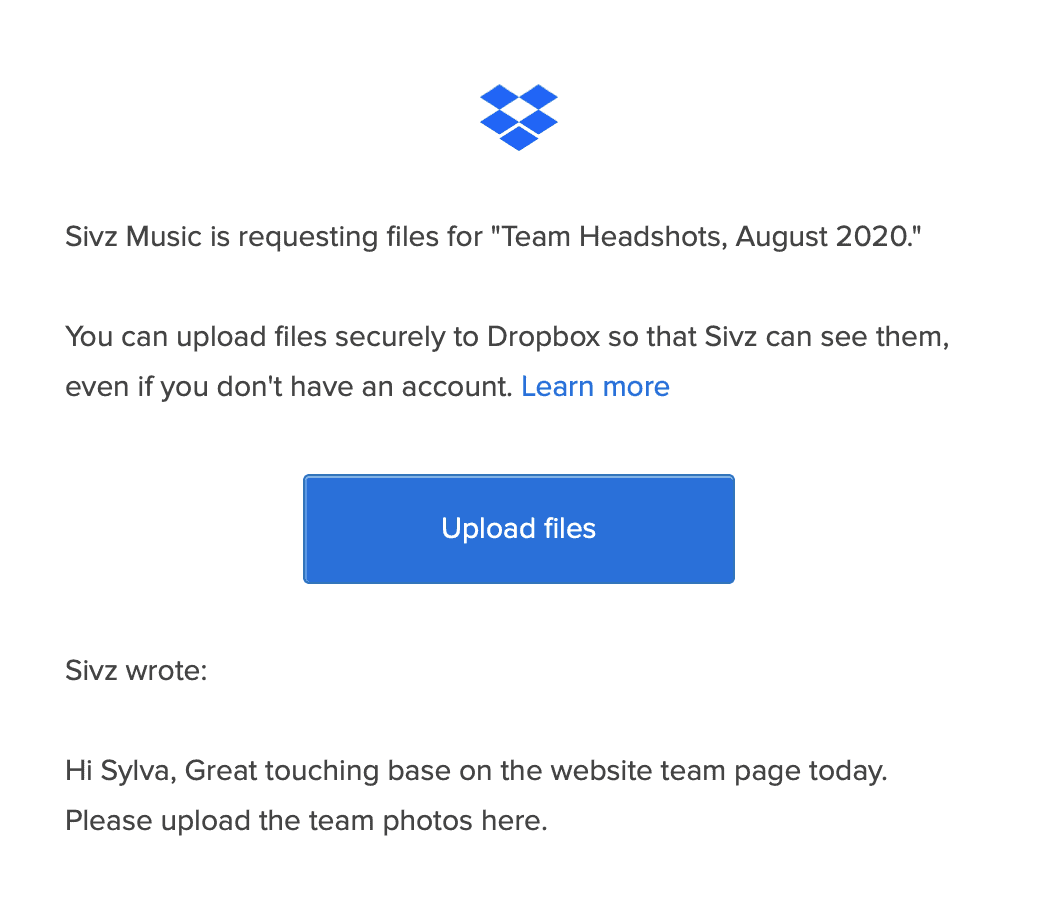
Whether they click the blue button in the email or access the link you sent over elsewhere, they’ll see your file request complete with the title the description you wrote in. It’ll look like this:
Your client can now upload to your file request by clicking on the “add files” button. It will give them the option to search for and upload:
- Filed from their computer
- Folders from their computer
- Files or folders from their own Dropbox if they have an account
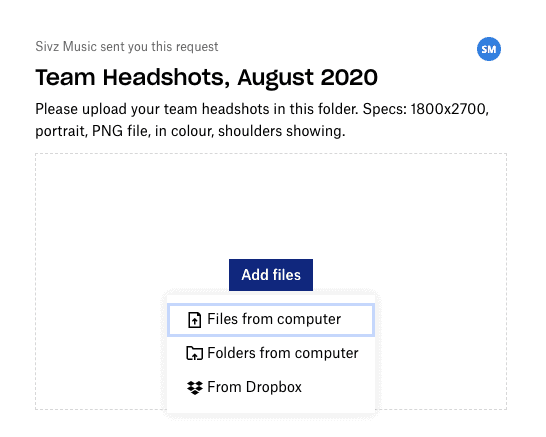
They can also drag and drop files from their computer over the Dropbox window.
Once your client has selected their files, the window will look like this:
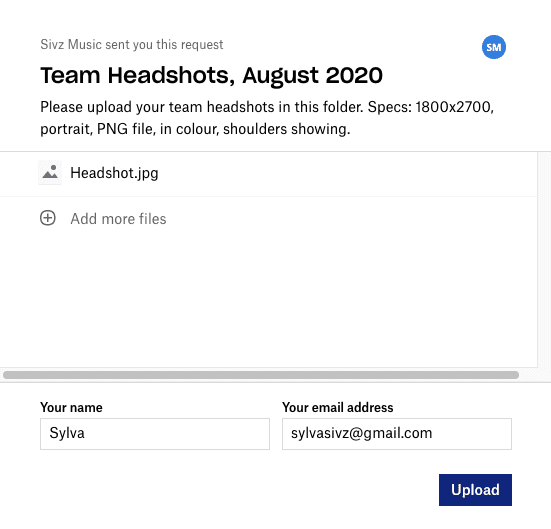
While they won’t need a Dropbox account to upload documents, they will need to leave a name and email address in the field at the bottom.
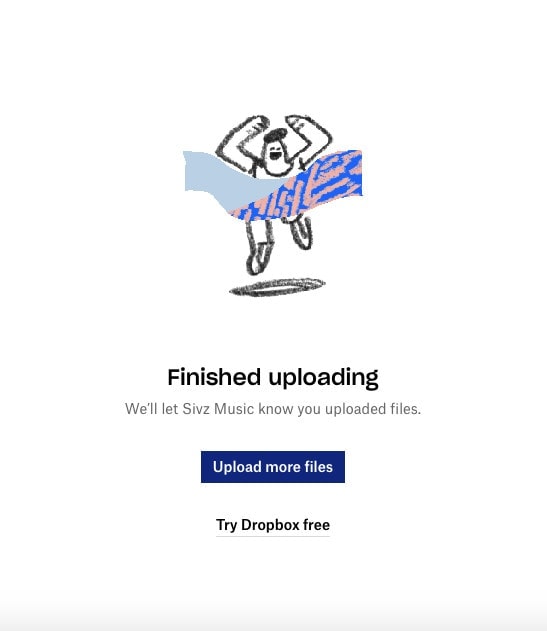
Once they hit the blue “upload” button, they’ll get a confirmation that their files went through.
Should they have missed a file, they still get the option to upload more files.
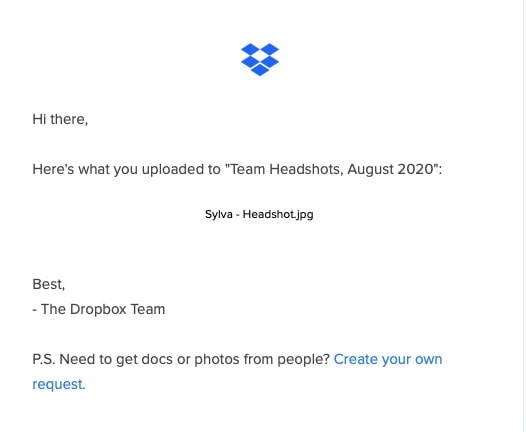
They’ll also get an email confirming what they uploaded.
How to view files from a Dropbox file request
Once your client uploads their files to your file request, you’ll get an email from Dropbox letting you know. It’ll look like this and will invite you to view the files:
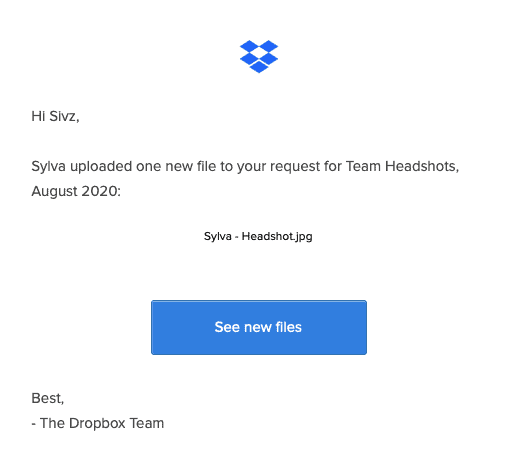
And boom! You’ll see a list of the files your client has uploaded on your file request page.
Once you’re in there, there are a couple of actions you can take by clicking on the three dots on the far right.
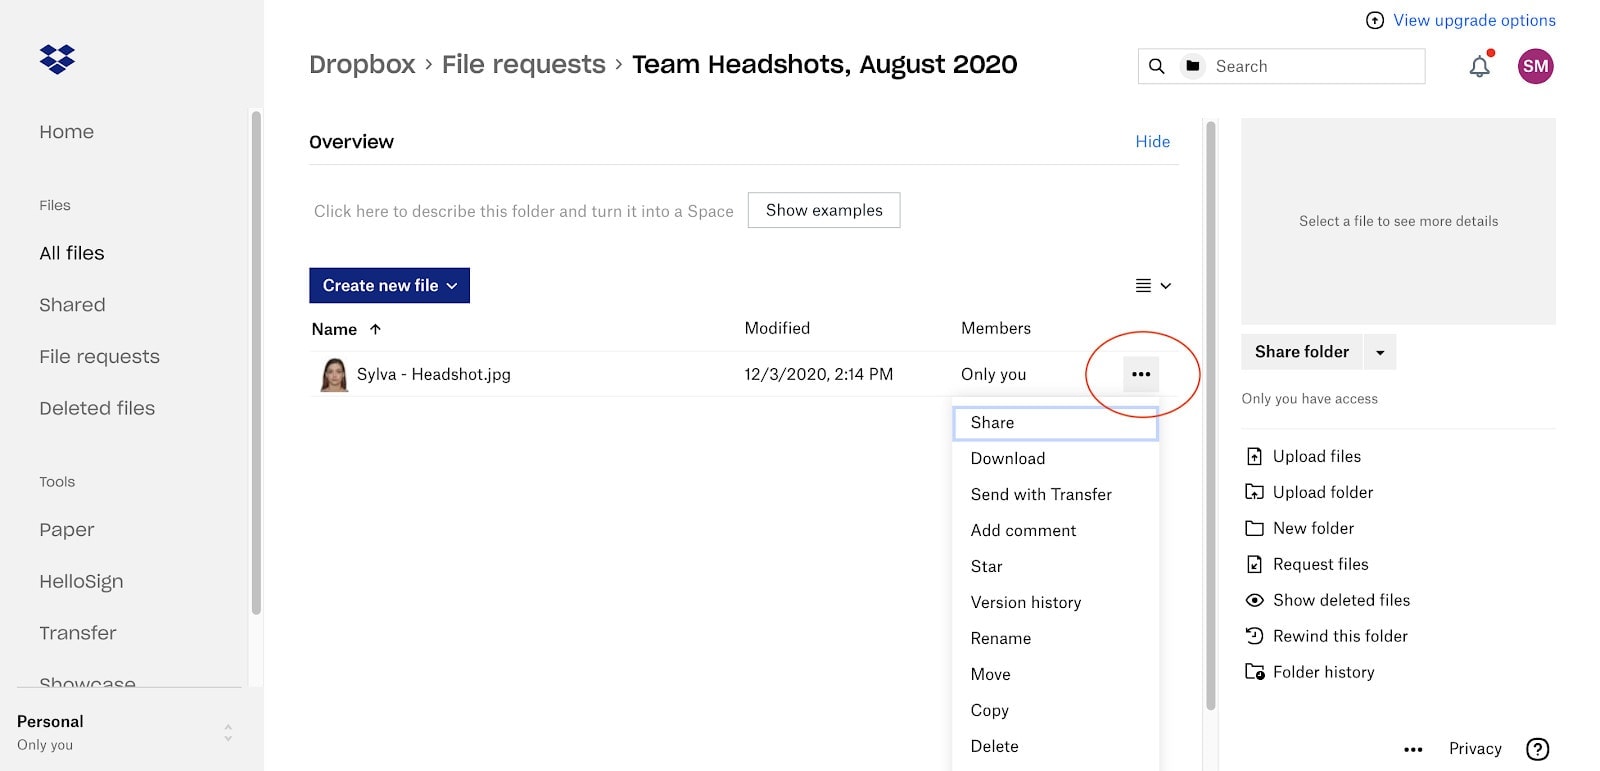
You can:
- Share
Share this file with someone else on your team, again via email or link. - Download
Select a location on your computer that you want to save the file to. - Send with transfer
Dropbox transfer lets you securely transfer large files to anyone and confirm delivery. Offered as an upgrade option, Dropbox lets you try this feature for free. - Add a comment
This will open up a new window next to the file and give you a space to leave a comment. You might use this space to say something like “Got it, thanks!”, or mention an issue with the file “Not sure this is the right one?”.When you leave a comment, it will notify your uploader.
- Star
Add a star next to the file or folder for easy finding later. - Version history
This will show you a history of versions of the file as well as when it was uploaded. It will come in handy if you’ve had to ask your client for multiple uploads to make corrections. - Rename
You can rename the file if you want to format it in a different way than your client has. For example, if your client had the file name as random numbers like 4566870, you might change it to “Headshot_team member name_date” to stay organized.
- Move
Move the file or folder elsewhere in your Dropbox - Copy
Copy over the file or folder elsewhere in your Dropbox.
Dropbox limitations to consider
Compared to some other shared drives, we think Dropbox is really great for receiving files because it has a simple interface, doesn’t require uploaders to have a Dropbox account, and has a specific file request feature.
There are a few things to keep in mind if you want to use Dropbox to receive files though:
- Approving or rejecting files takes some manual work
Although Dropbox has a comments feature where you can leave feedback on uploaded files, it doesn’t give you the option to easily approve or reject the uploaded file like Content Snare.If a client uploads the wrong version of a file, you’ll have to leave them a comment and hope your client notices Dropbox’s automatic email with your comment, or take matters into your own hands and follow up with the client over email. Bit of a time-waster.
- No built-in checklists
Another limitation of Dropbox is that it doesn’t have checklist features where you can check items off a checklist as the files come in. Even though you see when a client has uploaded content, you can’t see what’s outstanding. - No email reminder schedules
Dropbox will send your clients an email letting them know when a request has been created. But after that, it won’t necessarily follow up regularly. This again requires you to use email to remind or follow up with your clients. - No text inputs
Shared drives like Dropbox are made for people to upload documents and images. It falls short when it comes to collecting text responses. Let’s say you want a client to complete a form, then Dropbox isn’t the best solution for that. - Storage limits and file size limits
Another thing to keep in mind is what limits come with your Dropbox plan. Dropbox’s free plan starts you up with 2GB of free storage, from there, you can upgrade to different subscription options for individuals and for businesses, some plans of which offer unlimited storage.So if you’re going with a free or cheaper plan, you’ll want to stay on top of cleaning up your files and deleting those you no longer need to make sure you still have the space to collect files.
Compare Dropbox storage and pricing to other shared folder options here.
A Dropbox file request alternative
If you’re worried about any of these Dropbox disadvantages, then you might want to consider another, more all-encompassing tool for collecting files. And you betcha, it’s our very own!
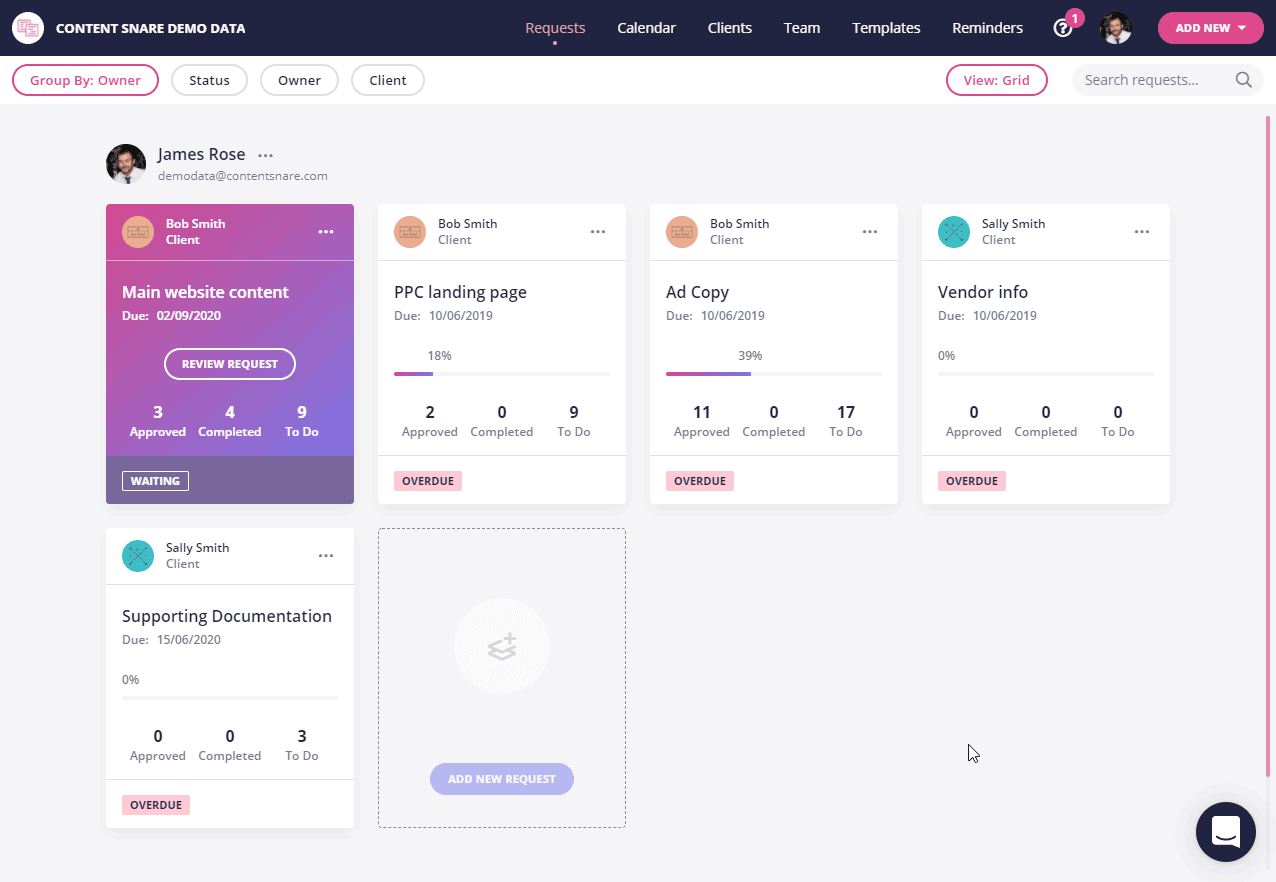
We built Content Snare to overcome the most common limitations of shared drives and traditional forms. Here are some features of the platform that will make your life easier when it comes to requesting files:
- Upload a combination files and text data
There’s no need to rely on one platform for files and images, and another for text. Content Snare can be used to collect both types of content. When you set up a request, you can ask for a combination of text, images, video, you name it. - Keep track of files with checklists
If you’re a neat freak like we are, then you’ll love Content Snare’s built-in checklists that you can create as you set up your request. Rather than creating your own excel sheet or jotting it all down on paper, you can simply check content off the list as it comes in, and be able to see what’s still missing in a glimpse.
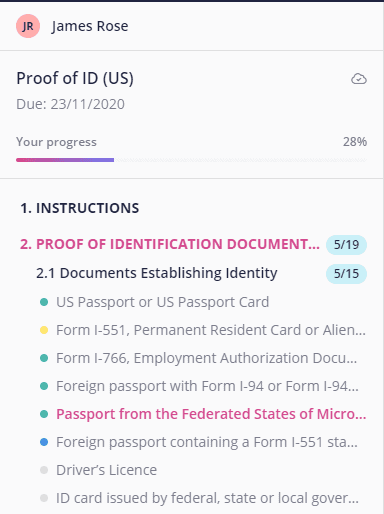
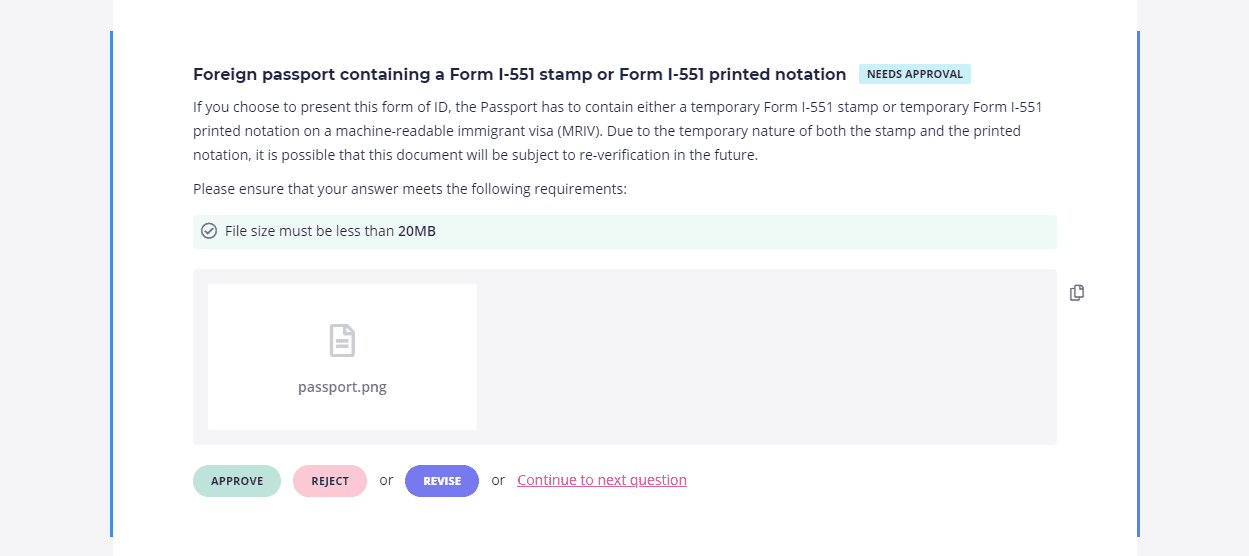
- Approve or reject files as they come in
Rather than dropping clients a comment or sending followup emails, Content Snare lets you approve or reject files as they come in. This will save you endless time going back and forth with your clients.
- Automatic and scheduled email reminders
We mentioned how Dropbox sends out an initial email but won’t necessarily send regular email reminders to clients. When you use Content Snare, you can set up time periods where the platform will do the work to remind your clients to send over their content.Since you can usually spend a good 10 minutes at a time on reminding clients over email, this is another huge time saver when you add it all up!
- Clients don’t need an account to upload
Last but not least, we’ve made life easier for your client too and removed any annoying barriers by making sure they can upload to Content Snare without having a Content Snare account. Yep!
If you’re thinking about switching to Content Snare and have any questions, drop us a comment and we’ll be sure to answer.


Hi Sylvia, your page is great! Just wanted to mention that I tried to edit an existing request, and I think it might be a Pro-only feature ... I didn't have that option. Cheers, Lisa
Hey Lisa - editing requests can be done on any plan. On the dashboard, click in the three-dot menu for the request you want to edit, then click edit. Changes you make are saved as you go.